So recently I've been getting more and more comments and questions on how I edit my Instagram photos. Because I've been doing it for so long it seems so normal and boring to me and I am always looking for new ways to improve but haven't thought of it yet! lol but I will get there and more on that in my next post. Thank you for your comments, and let's get into it, all secrets revealed! (not really secrets :D )

This is my main used app (VSCO CAM), I never use any other filters apart from the 3 I will show you here. I haven't used an Instagram filter for nearly two years now and I don't even remember what they look like anymore. This app is free, so you can all get it. You have to download the filters from the 'SHOP' category. Some are free and some are paid. I cannot remember and it doesn't show me if the filters I use are from paid or unpaid collections, really sorry, I will write all the names of the filters below.
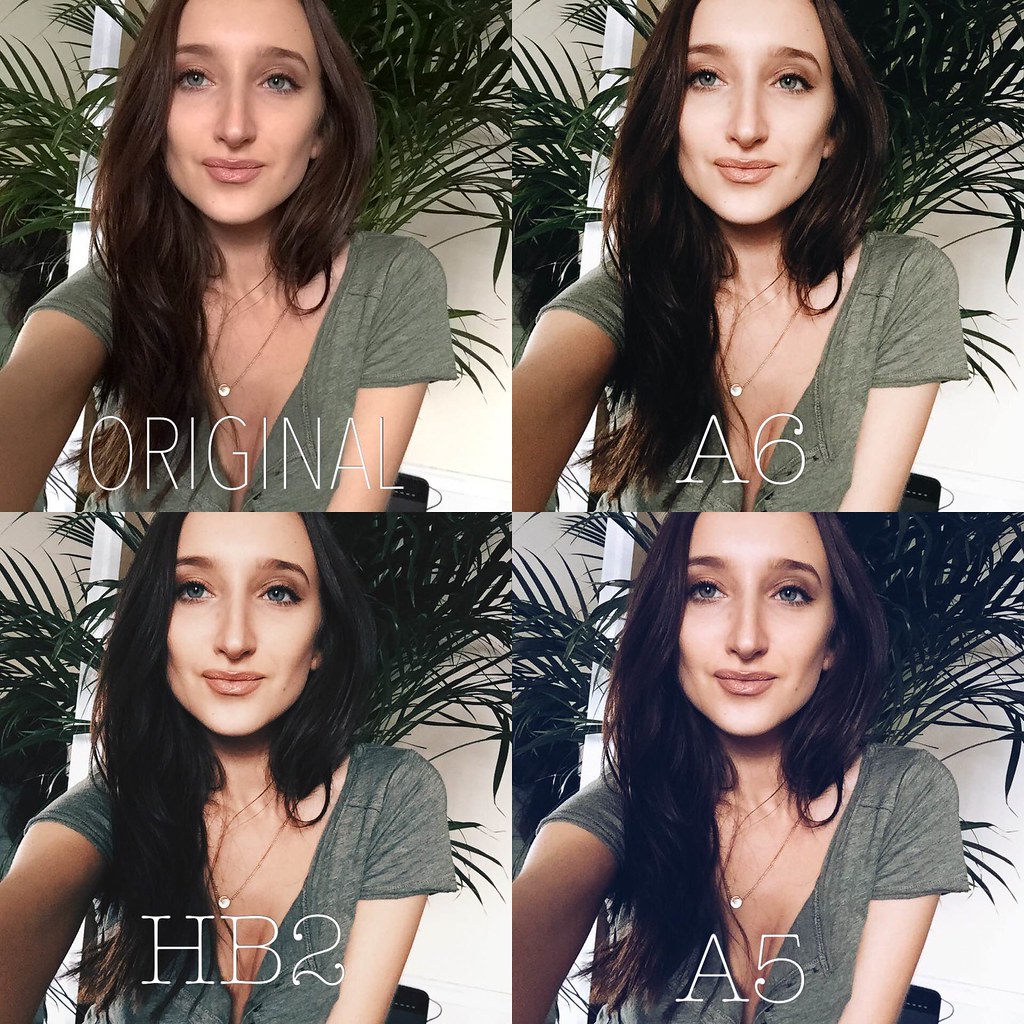
So, here it is. 70% of the time I use the HB2 filter, which is my absolute favourite. I then sometimes play a bit on brightness and contrast if the photo is too dark which you can also find on the app. I almost never use A5 but I love it a lot!! I just think it doesn't suit my Instagram theme anymore as it has a blue tint but if you're a fan of that, it's perfect! A6 is another favourite, use it a lot too. Very similar to HB2 but a bit lighter and softer. It depends on the photo obviously.
HB2 - HYPEBEAST x VSCO set
A5 and A6 - The Aesthetic series set

SNAPSEED
I use this app for one thing only - to make ugly coloured background look neutral haha that sounds so weird! Basically I select the 'Brush' category and choose 'Saturation' and click on the 'minus' button a few times until it shows -10. Then the brush will turn anything into black and white colours. It's hard to explain but here is an example below. This app is also free.

Huge difference right? Well maybe not to some, but my eye picks up small details for these things so I have to make it all look really good hehe! So first of all I edited this photo on VSCO with HB2 filter and then just used the brush :)

For collages (which I don't really do anymore) or to add text to my photo for example when I do giveaways I use this app - Photogrid. I've had it for years even when I owned an Android phone so it just stuck with me and I never really changed to a different app. This one is also free.
Here you have it guys! It probably seemed much more complicated right? But no, it's not that hard :). The most important thing to keep in mind if you want beautiful pictures is the light. I cannot tell you how important it is and I am talking about natural day light! If you use good light - all your pictures will look good. If you are shooting flatlays, makeup, or random items, the best place is next to a window, outside or somewhere where there's lots of natural light coming in. I never shoot in the dark, you can probably see 99% of my images are shot in daylight. That is the key!
Hope I was helpful and I will answer any more questions you have in the comments.
Now Im gonna watch The Office with Arnas. It's such a good show, I've seen it before but I we can't help ourselves lol! Buenos Noches!
(I now think I can speak Spanish because of another show Im watching! Can you guess which one?)

I like to use Pixlr Express. This is one of the few photo editors, where the pay components are missing completely. It has an interestingly huge selection of filters, frames and other functions. For Mac I advise to try https://macphun.com/intensify editing soft.
ReplyDelete